
Tracking Efforts in a T&M Project Using Google Sheets
When working with a time & materials (T&M) payment model (i.e., payment based on actual work performed and resources used) in small development teams, several questions arise: how to track labor costs and other resources, calculate the payment amount for the client, determine the payments for team members, manage all these calculations, and where to store agreements that evolve over time.
There are several ways to address these challenges. In this article, I will describe a fairly simple and practical method using Google Spreadsheets (https://www.google.com/sheets/about/).
The described tool offers flexibility in calculations, separates access between participants, allows you to revisit past payments, investigate discrepancies in reports, and expand functionality to meet specific needs.
Let’s start with an example:
[
ProjectName Time Tracking (example) - Google Drive
![]() Google Drive
Google Drive

](https://drive.google.com/drive/folders/1mcWN_9xwEWnbuy0Pq-t8nKEzsMjZ92MN)
This example demonstrates calculations for a project named "ProjectName," involving a team of two specialists: Michael Brown, a developer, and David Clark, a tester. The team has already received one payment in January 2022, while awaiting a second payment for the period named “February 2022,” all while continuing their work.
For those familiar with Google Sheets, the example alone might suffice. However, we will walk through the entire process.
This will include an overview of creating the initial tool for the project, setting up payment periods, and processing payments.
Setting Up a Tracking System
The idea is simple: for each project with a separate client (to whom you issue invoices), you create an individual tracking system as a dedicated folder on Google Drive.
In this folder, you copy the documents from the example provided and populate them with project-specific data.
You can name the folder something like “ProjectName Time Tracking.”
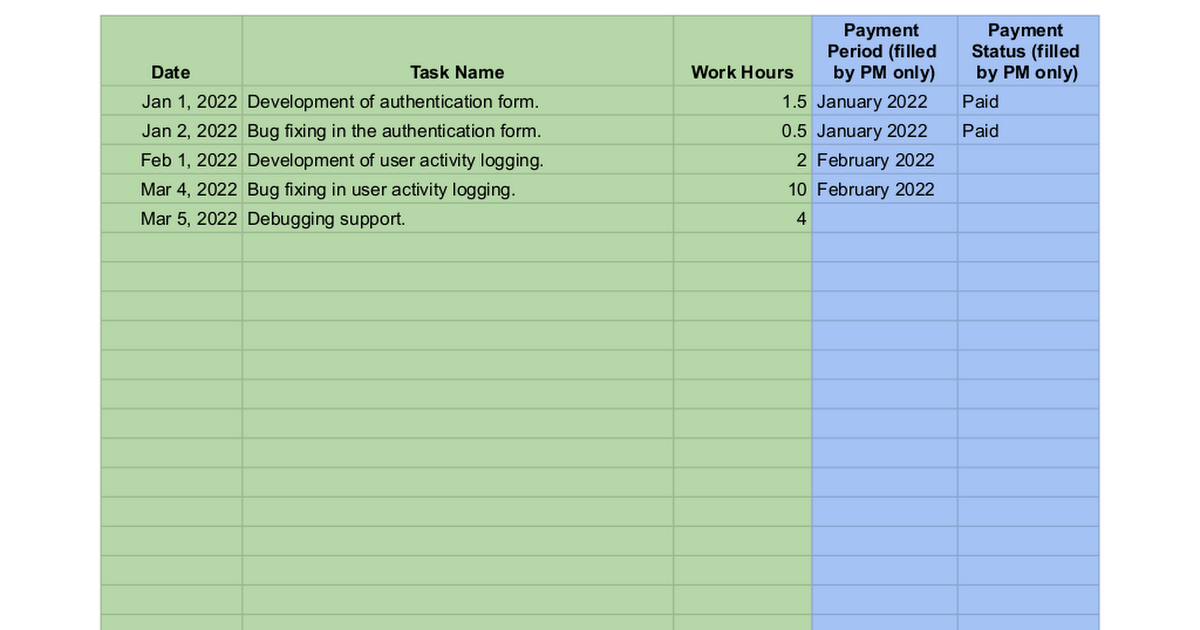
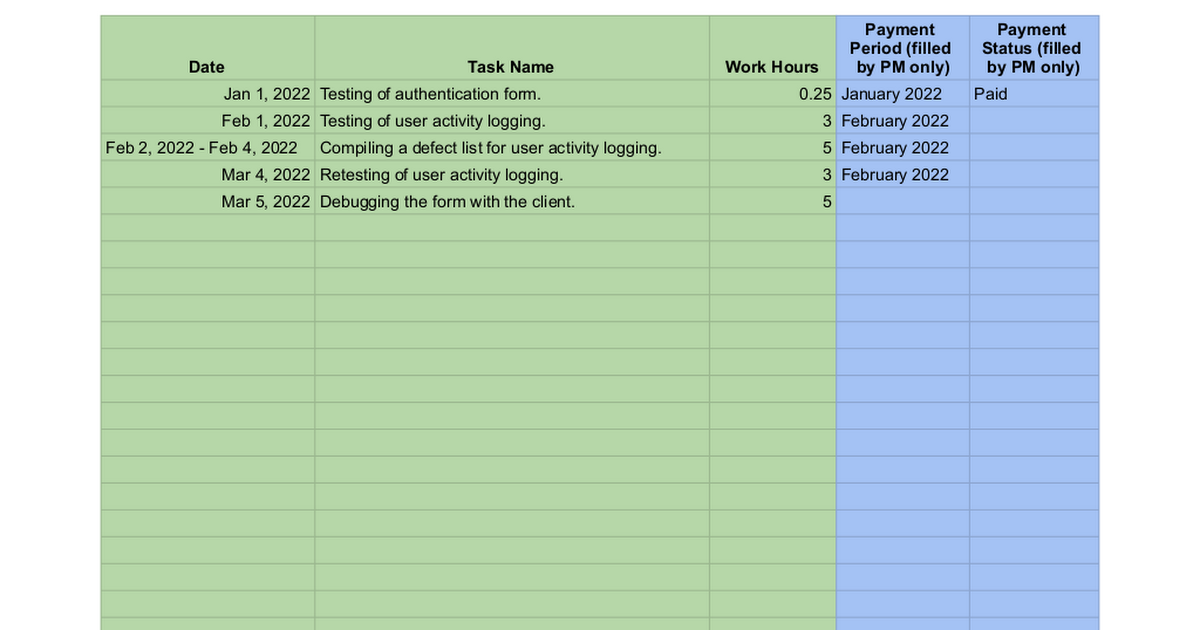
Creating Timesheets
For each project participant, create a separate Google Sheet (referred to as a timesheet) with a custom name. I prefer naming it along the lines of “Time Tracking for [First Name Last Name]. Project [ProjectName].”
[
Time Tracking for Michael Brown. Project ProjectName
Google Docs
[
Time Tracking for David Clark. Project ProjectName
Google Docs
Grant editing access to the specialist (and only them). Clients will have access to a different document.
The template already includes instructions with examples, so make sure to direct the specialist's attention to them. These instructions focus only on the critical points where issues typically arise.
- Specialists must leave the "Payment Period" field blank to ensure accurate preliminary calculations visible to the client.
- Fields intended for specialists are highlighted in green, while fields for the project manager are in blue.
The specialist is now responsible for maintaining their timesheet. When to fill it out is up to you, but it’s crucial to keep it updated before the payment period closes. Encouraging daily updates ensures the specialist doesn’t have to recall tasks at the end of the month, while clients can observe the cost progression in real-time.
Creating a Client Report
Once the timesheets are ready, create a document summarizing overall expenses for invoicing the client for a given period.
[
General Expenses Report. Project ProjectName
Google Docs

Use the Google Sheet “General Expenses Report. Project ProjectName” as a template. For each timesheet, create a tab named after the specialist’s first and last name, as shown in the example. Be precise with these names because the report uses them to fetch data.
In each tab, use the formula:
=IMPORTRANGE("1OElIxefrBVPVXMUFFDC-Ze1jj5Egm4IOXEu7aTOtYC8", "timesheet!A:D")
Replace 1OElIxefrBVPVXMUFFDC-Ze1jj5Egm4IOXEu7aTOtYC8 with the document ID from the specialist’s timesheet link:
https://docs.google.com/spreadsheets/d/1OElIxefrBVPVXMUFFDC-Ze1jj5Egm4IOXEu7aTOtYC8/edit#gid=623721750
Although you can import the document using the full link, I prefer using only the document ID for cleaner formulas. When you enter the formula, Google Sheets will ask for access permission to the other document—grant this access.
Remove the example payment periods (e.g., “January 2022” and “February 2022”).
On the “Current Period” tab, fill in the team details:
- Enter the specialist’s First Name Last Name exactly as it appears in the tab name.
- Add their role (to provide clarity for the client).
- Specify the hourly rate for the client in the required currency (you may need to adjust column headers).
Fields to fill in now are marked green, fields for the period closing are marked blue, and auto-calculated fields are marked yellow.
Provide commenting access to the client but not to the specialists. This allows the client to see work progress, the current period’s preliminary totals, and finalized calculations for past payment periods.
Creating an Internal Report
If you use this tool for both invoicing the client and calculating payments to team members, you’ll need a separate file for internal calculations.
[
CONFIDENTIAL. Payment Distribution. Project ProjectName
Google Docs

In the example, this file is named “CONFIDENTIAL. Payment Distribution. Project ProjectName.”
This document only differs in how imported hours are calculated. Follow the same steps as for the client report to set it up.
This file provides an overview of the team’s performance, including:
- Client debt,
- Your debt to the team,
- Revenue for the period.
Neither the client nor the specialists should have access to this file.
Closing a Payment Period
When it’s time to invoice the client, name the payment period and update it in the specialists’ timesheets, then create corresponding tabs in the reports.
Most invoices are issued monthly, so the payment period name usually matches the nearest month and year (e.g., “January 2022” for work performed in January 2022). However, any naming convention is fine as long as it is consistent across timesheets and reports.
Payment Period in Timesheets
In each specialist’s timesheet, update the "Payment Period" field for the tasks included in this period.
Technically, you can do this by:
- Typing the period name into the first empty cell.
- Copying the cell (Ctrl+C).
- Pasting it into all relevant cells (Ctrl+V).
Payment Period in Reports
In the client and internal reports, create a new tab named after the payment period (e.g., “January 2022”). This isn’t mandatory for calculations but helps keep things organized.
To do this, duplicate the “Current Period” tab and rename it.
If there were team changes since the last payment, now is the time to reflect those updates in the reports, as you did during their creation.
Fill in the "Period" field for each specialist in the new tab. Use the same copy-paste method as for the timesheets.
Move the previous period’s tab to the end of the sheet, keeping it accessible but out of the way.
Finalizing the Invoice
In the client report, the newly created tab for the payment period contains the final calculations you’ll reference when issuing the invoice.
If the client requests more details, they can access the specialists’ timesheets directly. They may also leave comments on any cell if you’ve provided commenting access.
This system ensures clarity for all parties involved and simplifies the payment process.
Payment Process
Once the payment period is finalized, you send the client invoices, acts, and other required documentation. These documents are created independently, as the presented tool does not automate this task. While I sometimes use the tool for generating acts, this requires a more tailored approach.
We revisit the client report upon receiving payment to note the payment confirmation for both internal tracking and the client (e.g., see the “January 2022” tab).
Next, the internal report is used to calculate payments for the specialists.
The report indicates the amount owed to each specialist. You can copy a pre-generated text from a cell to share with the specialist for agreement before making the payment:
Michael Brown - Project: ProjectName - Period: January 2022 - Hours: 2 - Rate (USD): 8 - Total (USD): 16
Feel free to adjust the message template to suit your needs.
Important: The tool does not account for taxes, fees, or other statutory payments you are obligated to report and pay to comply with the laws in your operating country.
As payments are made to specialists, update their timesheets to reflect the payment status for both your records and theirs.
At this point, the payment period is closed, though you can revisit it later for retrospective analysis.
When it’s time for the next payment period, repeat the procedure.
Advantages
Flexibility
The described tool is highly adaptable to the specific needs of any given period. For instance:
- You can include additional expenses like cloud computing costs or resource purchases in the expense report.
- It supports adjustments for specialists' hourly rates during a payment period or managing multiple roles with different rates.
Access Control
The primary advantage of this tool is the ability to segment access for all participants:
- Specialists only see their own work, hours, and payment status.
- Clients view the team's efforts and the terms of cooperation.
- You, as the team lead, have access to all details.
Retrospective Analysis
Unlike simpler cost calculators, this tool maintains a history of calculations. This is useful for comparing payments across periods or analyzing average rates for specialists.
Expandability
If you have someone managing the tool, you can use the “Protect range” feature to safeguard closed payment periods from accidental edits. Additionally, you can expand timesheets and reports with custom fields and tabs as needed. For example, you might add a report summarizing the total cost of all work with analytics for the entire project period. I’ve excluded such features here to keep the tool focused on its primary purpose.
Protection Against Backdated Changes
Google Sheets offers a robust version history feature, allowing you to trace changes and identify who modified the data in case of discrepancies.
Conclusion
It’s worth emphasizing once again that this tool does not handle statutory reporting for the jurisdiction in which you operate.
For internal use, we rely on a more advanced system built on the same concepts described here. This system has been adapted to meet our specific needs and continues to evolve. Perhaps one day, if there’s interest, we’ll share more details about it.